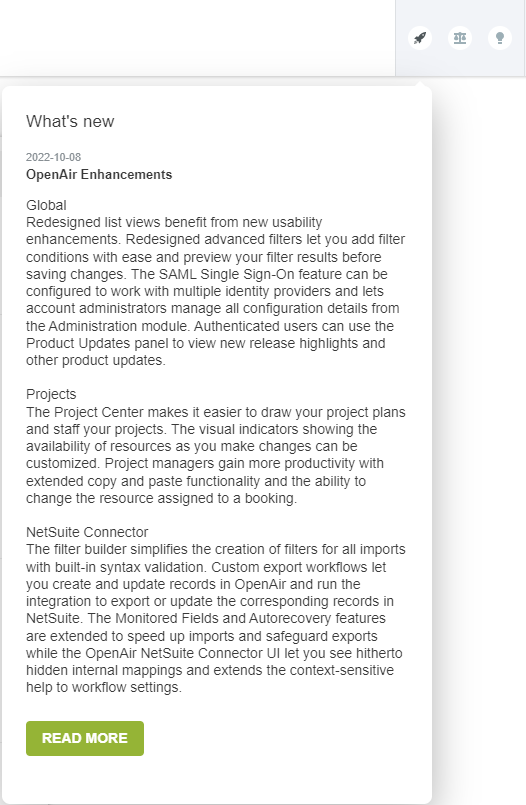
Enhancements
![]()
Enhancements
Note: Release Notes are best viewed in the OpenAir Help Center (What's New > Release Notes). Some of the links on this page point to help topics for additional information.
To view the OpenAir Help Center, log in to OpenAir and click Help Center from the User Center menu.
Preview your filter results before saving changes, filter for inactive employees and benefit from other UI improvements.
Redesigned list views benefit from new usability enhancements.
Preview the redesigned login page before it is rolled out to all sandbox and production accounts.
View new release highlights and other product updates from the OpenAir UI.
Configure the OpenAir SAML Single Sign-On feature to work with multiple identity providers and upload the metadata for each identity provider from the Administration module.
Customize the resource availability indicators, use keyboard keys to select multiple values, use the fill handle to copy multiple values into adjacent cells, and change booked resources from within the Project Center.
New extensions to the OpenAir XML API and SOAP API.
New extensions to the OpenAir REST API.
Clear all log entries for a specific script from the Scripting Center.
Increase the maximum body length of email messages that can be sent from your form or scheduled scripts.
Control who can view the OData limits for your accounts by role permission.
Use the new filter builder to define filter conditions for each import workflow.
Create and update records in OpenAir and run the integration to export or update the corresponding records in NetSuite.
View online help for each NetSuite Connector workflow setting.
View internal field mappings and mapping group tabs used by the integration.
Use the Project mapping group to include project-specific information from the project record in OpenAir as header information on the NetSuite credit memo transaction record.
Speed up your Employees (Employees) and Projects (Projects) import workflows by ensuring only that records are only included in the integration run if one or more integrated field values have changed.
Copy the bookings from an OpenAir project template when you import a new project from NetSuite into OpenAir.
Enable the Autorecovery feature for the Customers (Customers) and Projects (Projects) export workflows.
The Health Check now shows an error if OpenAir NetSuite Connector uses the 2016.2 NetSuite communication endpoint, which is no longer supported.
All four NetSuite bundles for the NetSuite <> OpenAir integration include SuiteScript 2 versions of all scripts.
Download OpenAir Mobile 4.3 from the App Store (iOS devices) or Google Play Store (Android devices) and get a sneak peek at the upcoming features in version 4.4.
Usage of the generic domain www.openair.com for integrations and add-on services is deprecated and will be removed in the April 2023 OpenAir release.
OpenAir will end support for the QuickBooks integration using the OpenAir Integration Manager add-on service with the April 2023 OpenAir release.
OpenAir will end support for the 2016.2 NetSuite communication endpoint and the legacy OpenAir NetSuite Connector UI with the October 2022 release.
upPreview your filter results before saving changes, filter for inactive employees and benefit from other UI improvements.
The following features are available if the Redesigned Advanced Filters feature is enabled for your account:
Note: To enable this feature, contact OpenAir Customer Support.
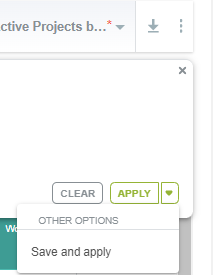
Add filter conditions and preview your advanced filter results before saving changes.
You can now add filter conditions to a new or existing advanced filter or modify the filter conditions and click Apply to preview the advanced filter results before you save your changes. The list view shows the items matching all filter conditions in the filter panel including any unsaved changes you made to the filter conditions.
To save changes to the filter conditions before viewing the advanced filter results, click the caret next to Apply, then click Save and Apply.
The redesigned advanced filter panel includes the following enhancements:
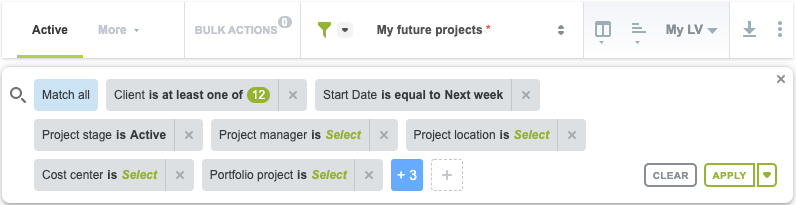
The filter panel does not close when you refresh the page. It stays open until you close it manually.
The filter panel does not overlap with the list view. Your list view column headers and data are always visible when the filter panel is open.
The filter panel shows a maximum of three rows of filter conditions when you first open it. A + n button indicates there are n more additional filter conditions defined for this filter. Click + n to expand the filter panel and show all filter conditions.
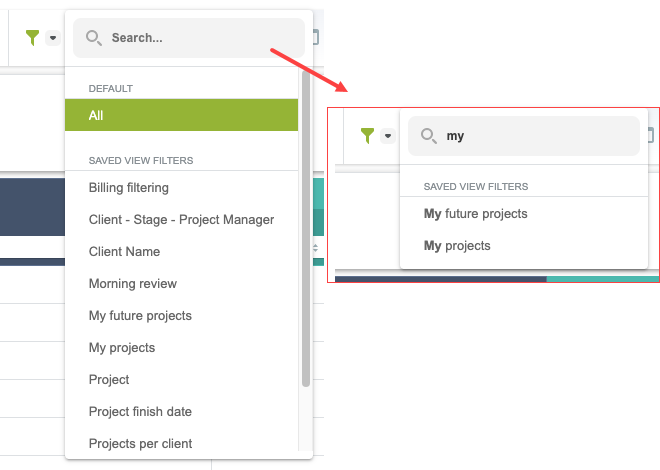
The filter selector in the list view toolbar now includes a search bar. To search for a specific filter, type a few characters of the filter names in the search bar. The dropdown list is refined as you type to show only the saved filters with names list matching your search string.
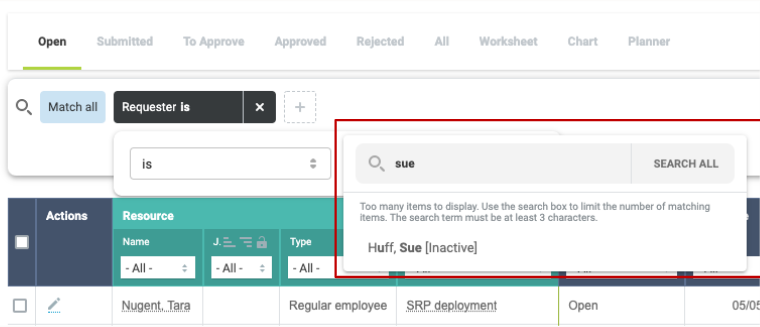
Define filter conditions with inactive employees as values. If the Allow searches for inactive resource box is checked in Administration > Application Settings > Resources > Other Settings, you can search and select both active and inactive employees as values in your filter conditions.
Redesigned list views benefit from the following usability enhancements:
Add a column filter for the Assigned to column in the Project > Tasks list view. You can then use the column filter to list only those tasks assigned to specific resources.
Note: To enable this feature, contact OpenAir Customer Support.
Important: Enabling this feature may impact the Project > Tasks list view performance.
Identify metavalues easily in the column filter dropdown list.
Metavalues are now shown with leading and trailing dashes to distinguish them from other values.
On the Worskpaces > Documents list view, you can now:
Use the Expand All and Collapse All icons in the column header to expand or collapse all folders in the document tree.
Use bulk actions to download multiple documents at the same time. To do so:
Check the box next to each document you want to include in the download.
Click Bulk Actions in the list view toolbar. The Bulk Actions dialog appears.
Choose Download attachments and click Apply.
The Bulk Actions dialog shows the status of your download.

On the Resources > Profile Approval list view, you can now use bulk actions to approve or reject multiple skill changes. To do so:
Check the box next to each skill change you want to include in the approval or rejection.
Click Bulk Actions in the list view toolbar. The Bulk Actions dialog appears.
Choose Approve selected or Reject selected and click Apply.
The Bulk Actions confirmation dialog shows the approval status for each skill change and includes an error message if the action could not be completed for any of the selected skill changes.
The bulk approve and reject actions are supported whether OpenAir is configured to list each skill changes individually or to group skill changes made in one editing session (envelope level skill approval) in the Resources > Profile Approval list view.
Preview the redesigned login page before it is rolled out to all sandbox and production accounts.
The login page for all OpenAir production and sandbox accounts will change in coming months.
Important: Refer to the Proactive Feature Change Notification (PFCN) to be sent after the October 8, 2022 OpenAir release for further information and confirmation of the rollout dates to sandbox and production accounts.
You can preview the redesigned login page from October 8, 2022 by going to the login page for OpenAir demo accounts (https://auth.demo.openair.com/login). If you are using the latest version of the OpenAir Mobile app on Android or iOS devices, you are already familiar with a version of the redesigned login page adapted for smaller displays.
The redesigned login page includes all current login page functionality except release highlights. Authenticated users may view new release highlights and other product updates in the OpenAir UI if the Product Updates Panel optional feature is enabled for your account. See Product Updates Panel.
View new release highlights and other product updates from the OpenAir UI.
Click the Product Updates utility button to view a panel with new release highlights and other product updates. The Product Updates utility button is highlighted after each release to indicate that there are new product updates available.
Note: This optional feature is enabled by default. To disable it, contact OpenAir Customer Support.
Configure the OpenAir SAML Single Sign-on feature to work with multiple identity providers and upload the metadata for each identity provider from the Administration module.
Effective October 8, 2022, you no longer need to contact OpenAir Customer Support to add, remove or change identity provider (IdP) details or to update your IdP metadata when replacing or renewing the IdP security certificate. Use this optional feature to update your IdP configuration and metadata as and when required.
With this optional feature, you can now:
Configure the OpenAir SAML Single Sign-on feature to work with multiple identity providers.
Important: Multiple identity provider support is currently available only for identity provider initiated single sign-on.
Review configured identity providers from a list view.
Configure the profile and upload the metadata XML file for each identity provider.
Set any identity providers as active. Only active identity providers can be used for service provider or identity provider initiated single sign-on.
Select one default identity provider. Service provider initiated single sign-on request are sent to the default identity provider when using the OpenAir login form for single sign-on users.
For more information, see Configuring the SAML Integration in OpenAir.
Important: Previously, you could contact OpenAir Customer Support to have OpenAir Operations engineers import the IdP metadata on your behalf and add your IdP Entity ID to the circle of trust for OpenAir. Effective October 8, 2022, OpenAir Customer Support will instruct you to upload identity provider metadata using the Self-Service SAML Identity Provider Profile Configuration feature instead.
You should enable this feature for your account before you need to replace or renew your IdP security certificate. To enable this feature, contact OpenAir Customer Support.

up
Preview your filter results before saving changes, filter for inactive employees and benefit from other UI improvements.
The following features are available if the Redesigned Advanced Filters feature is enabled for your account:
Note: To enable this feature, contact OpenAir Customer Support.
Add filter conditions and preview your advanced filter results before saving changes.
You can now add filter conditions to a new or existing advanced filter or modify the filter conditions and click Apply to preview the advanced filter results before you save your changes. The list view shows the items matching all filter conditions in the filter panel including any unsaved changes you made to the filter conditions.
To save changes to the filter conditions before viewing the advanced filter results, click the caret next to Apply, then click Save and Apply.
The redesigned advanced filter panel includes the following enhancements:
The filter panel does not close when you refresh the page. It stays open until you close it manually.
The filter panel does not overlap with the list view. Your list view column headers and data are always visible when the filter panel is open.
The filter panel shows a maximum of three rows of filter conditions when you first open it. A + n button indicates there are n more additional filter conditions defined for this filter. Click + n to expand the filter panel and show all filter conditions.
The filter selector in the list view toolbar now includes a search bar. To search for a specific filter, type a few characters of the filter names in the search bar. The dropdown list is refined as you type to show only the saved filters with names list matching your search string.
Define filter conditions with inactive employees as values. If the Allow searches for inactive resource box is checked in Administration > Application Settings > Resources > Other Settings, you can search and select both active and inactive employees as values in your filter conditions.
Redesigned list views benefit from the following usability enhancements:
Add a column filter for the Assigned to column in the Project > Tasks list view. You can then use the column filter to list only those tasks assigned to specific resources.
Note: To enable this feature, contact OpenAir Customer Support.
Important: Enabling this feature may impact the Project > Tasks list view performance.
Identify metavalues easily in the column filter dropdown list.
Metavalues are now shown with leading and trailing dashes to distinguish them from other values.
On the Worskpaces > Documents list view, you can now:
Use the Expand All and Collapse All icons in the column header to expand or collapse all folders in the document tree.
Use bulk actions to download multiple documents at the same time. To do so:
Check the box next to each document you want to include in the download.
Click Bulk Actions in the list view toolbar. The Bulk Actions dialog appears.
Choose Download attachments and click Apply.
The Bulk Actions dialog shows the status of your download.
On the Resources > Profile Approval list view, you can now use bulk actions to approve or reject multiple skill changes. To do so:
Check the box next to each skill change you want to include in the approval or rejection.
Click Bulk Actions in the list view toolbar. The Bulk Actions dialog appears.
Choose Approve selected or Reject selected and click Apply.
The Bulk Actions confirmation dialog shows the approval status for each skill change and includes an error message if the action could not be completed for any of the selected skill changes.
The bulk approve and reject actions are supported whether OpenAir is configured to list each skill changes individually or to group skill changes made in one editing session (envelope level skill approval) in the Resources > Profile Approval list view.
Preview the redesigned login page before it is rolled out to all sandbox and production accounts.
The login page for all OpenAir production and sandbox accounts will change in coming months.
Important: Refer to the Proactive Feature Change Notification (PFCN) to be sent after the October 8, 2022 OpenAir release for further information and confirmation of the rollout dates to sandbox and production accounts.
You can preview the redesigned login page from October 8, 2022 by going to the login page for OpenAir demo accounts (https://auth.demo.openair.com/login). If you are using the latest version of the OpenAir Mobile app on Android or iOS devices, you are already familiar with a version of the redesigned login page adapted for smaller displays.
The redesigned login page includes all current login page functionality except release highlights. Authenticated users may view new release highlights and other product updates in the OpenAir UI if the Product Updates Panel optional feature is enabled for your account. See Product Updates Panel.
View new release highlights and other product updates from the OpenAir UI.
Click the Product Updates utility button to view a panel with new release highlights and other product updates. The Product Updates utility button is highlighted after each release to indicate that there are new product updates available.
Note: This optional feature is enabled by default. To disable it, contact OpenAir Customer Support.
Configure the OpenAir SAML Single Sign-on feature to work with multiple identity providers and upload the metadata for each identity provider from the Administration module.
Effective October 8, 2022, you no longer need to contact OpenAir Customer Support to add, remove or change identity provider (IdP) details or to update your IdP metadata when replacing or renewing the IdP security certificate. Use this optional feature to update your IdP configuration and metadata as and when required.
With this optional feature, you can now:
Configure the OpenAir SAML Single Sign-on feature to work with multiple identity providers.
Important: Multiple identity provider support is currently available only for identity provider initiated single sign-on.
Review configured identity providers from a list view.
Configure the profile and upload the metadata XML file for each identity provider.
Set any identity providers as active. Only active identity providers can be used for service provider or identity provider initiated single sign-on.
Select one default identity provider. Service provider initiated single sign-on request are sent to the default identity provider when using the OpenAir login form for single sign-on users.
For more information, see Configuring the SAML Integration in OpenAir.
Important: Previously, you could contact OpenAir Customer Support to have OpenAir Operations engineers import the IdP metadata on your behalf and add your IdP Entity ID to the circle of trust for OpenAir. Effective October 8, 2022, OpenAir Customer Support will instruct you to upload identity provider metadata using the Self-Service SAML Identity Provider Profile Configuration feature instead.
You should enable this feature for your account before you need to replace or renew your IdP security certificate. To enable this feature, contact OpenAir Customer Support.
up
Customize the resource availability indicators, use keyboard keys to select multiple values, use the fill handle to copy multiple values into adjacent cells, and change booked resources from within the Project Center.
The following features are available if the Project Center feature is enabled for your account:
Note: To enable the Project Center feature, contact OpenAir Customer Support.
For more information about the Project Center feature, see Working with the Project Center View.
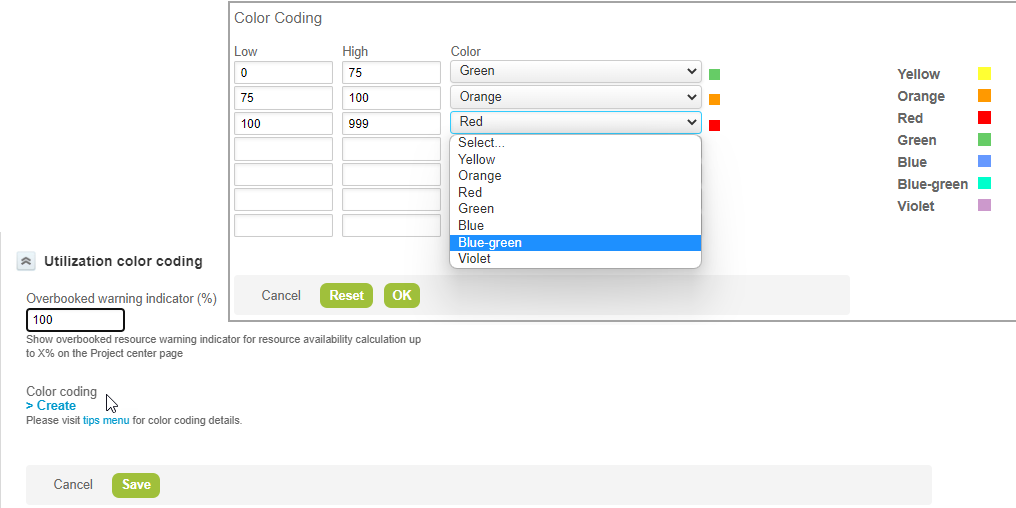
Customize the resource availability indicator in the Project Center view, and set your own resource utilization ranges and color coding.
The availability indicator shows the number of hours available for booking and a horizontal progress bar representing the proportion of the resource’s working hours that are already booked for that week. It is updated automatically across all bookings as you make changes and helps you identify whether resources are underutilized or overbooked on a week by week basis.
Go to Administration > Application Settings > Projects > Project Center Options.
Enter the utilization threshold for the Overbooked warning indicator (%). The utilization threshold is given as a percentage of working hours in a given week. The value must be between 0 and 999.
The booking grid cell shows a warning indicator if the total number of hours the resource is booked for is greater than or equal to the specified percentage of working hours.
Note: In this context, utilization is understood as the percentage of working hours the resource is currently booked for across all projects in a given week.
Click > Create under Color coding.
The Color coding grid appears.
Define up to 7 utilization ranges (one per row) and their corresponding colors to suit your business requirements. For each utilization range:
Enter the lower limit for the utilization range under Low.
Enter the upper limit for the utilization range under High.
Note: Each utilization range includes the lower limit and excludes the upper limit.
Select the Color to be used for the availability indicator progress bar.
Note: Non-utilized working hours (the left portion of the progress bar if the utilization is under 100%) always shows in gray color. If there are no bookings for the resource, the entire bar shows in gray color. This gray color is not customizable.
Click Save
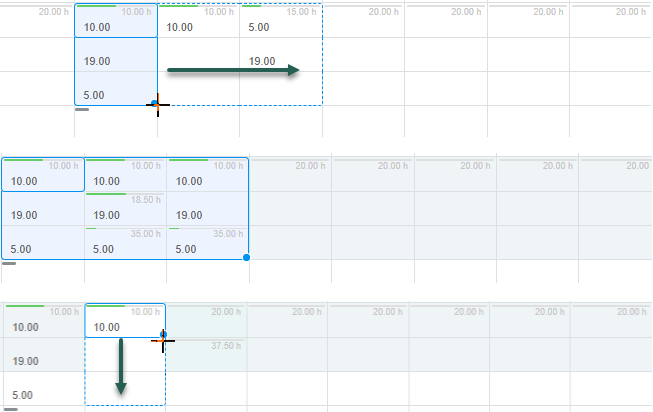
Use keyboard keys to select a range of adjacent cells.
Select a cell, then use Shift + Arrow Keys to extend the selection range both horizontally and vertically.
Copy multiple values into adjacent cells horizontally or vertically using the fill handle.
Previously you could only copy a single booking row cell to adjacent cells on the same row using the fill handle. Now you can use the fill handle to copy multiple booking row cells to adjacent cells horizontally or vertically.
Drag to select the range of adjacent cells you want to copy (source range).
Note: You can also use keyboard keys to select a range of adjacent cells. See Cell Range Selection Using Keyboard Keys.
Point to the fill handle on the bottom right corner of the selected range.
The cursor becomes a + sign.
Drag the fill handle to the right, to the left, above, or below across the range of cells you want to fill (destination range).
The destination range is outlined with a blue dotted line.
Release the mouse.
The destination range is filled automatically with the values of the copied cells. Any existing values in the destination range are overwritten. If the destination range is larger than the source range, the source range values are repeated as a pattern to fill the entire destination range.
Note: Changes in the project center booking worksheet are not saved automatically. To save the changes, click Save. To discard the changes, click Discard.
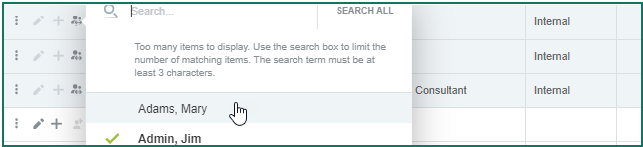
Change the booked resources from within the Project Center view.
To change the resource for all the bookings on a booking row, click the Change Resource icon ![]() , then select a named resource or a generic resource from the dropdown list. You can use the search bar to refine the dropdown list to show only the resources with names matching your search string.
, then select a named resource or a generic resource from the dropdown list. You can use the search bar to refine the dropdown list to show only the resources with names matching your search string.
up
Customize the resource availability indicators, use keyboard keys to select multiple values, use the fill handle to copy multiple values into adjacent cells, and change booked resources from within the Project Center.
The following features are available if the Project Center feature is enabled for your account:
Note: To enable the Project Center feature, contact OpenAir Customer Support.
For more information about the Project Center feature, see Working with the Project Center View.
Customize the resource availability indicator in the Project Center view, and set your own resource utilization ranges and color coding.
The availability indicator shows the number of hours available for booking and a horizontal progress bar representing the proportion of the resource’s working hours that are already booked for that week. It is updated automatically across all bookings as you make changes and helps you identify whether resources are underutilized or overbooked on a week by week basis.
Go to Administration > Application Settings > Projects > Project Center Options.
Enter the utilization threshold for the Overbooked warning indicator (%). The utilization threshold is given as a percentage of working hours in a given week. The value must be between 0 and 999.
The booking grid cell shows a warning indicator if the total number of hours the resource is booked for is greater than or equal to the specified percentage of working hours.
Note: In this context, utilization is understood as the percentage of working hours the resource is currently booked for across all projects in a given week.
Click > Create under Color coding.
The Color coding grid appears.
Define up to 7 utilization ranges (one per row) and their corresponding colors to suit your business requirements. For each utilization range:
Enter the lower limit for the utilization range under Low.
Enter the upper limit for the utilization range under High.
Note: Each utilization range includes the lower limit and excludes the upper limit.
Select the Color to be used for the availability indicator progress bar.
Note: Non-utilized working hours (the left portion of the progress bar if the utilization is under 100%) always shows in gray color. If there are no bookings for the resource, the entire bar shows in gray color. This gray color is not customizable.
Click Save
Use keyboard keys to select a range of adjacent cells.
Select a cell, then use Shift + Arrow Keys to extend the selection range both horizontally and vertically.
Copy multiple values into adjacent cells horizontally or vertically using the fill handle.
Previously you could only copy a single booking row cell to adjacent cells on the same row using the fill handle. Now you can use the fill handle to copy multiple booking row cells to adjacent cells horizontally or vertically.
Drag to select the range of adjacent cells you want to copy (source range).
Note: You can also use keyboard keys to select a range of adjacent cells. See Cell Range Selection Using Keyboard Keys.
Point to the fill handle on the bottom right corner of the selected range.
The cursor becomes a + sign.
Drag the fill handle to the right, to the left, above, or below across the range of cells you want to fill (destination range).
The destination range is outlined with a blue dotted line.
Release the mouse.
The destination range is filled automatically with the values of the copied cells. Any existing values in the destination range are overwritten. If the destination range is larger than the source range, the source range values are repeated as a pattern to fill the entire destination range.
Note: Changes in the project center booking worksheet are not saved automatically. To save the changes, click Save. To discard the changes, click Discard.
Change the booked resources from within the Project Center view.
To change the resource for all the bookings on a booking row, click the Change Resource icon ![]() , then select a named resource or a generic resource from the dropdown list. You can use the search bar to refine the dropdown list to show only the resources with names matching your search string.
, then select a named resource or a generic resource from the dropdown list. You can use the search bar to refine the dropdown list to show only the resources with names matching your search string.
up
New extensions to the OpenAir XML API and SOAP API.
This release includes the following XML API and SOAP API enhancements:
The following table lists the Object types and properties introduced in this release.
|
SOAP Complex Type |
XML Data Type |
Property |
Description |
|---|---|---|---|
|
oaCustomer |
Customer |
customer_location_id |
Read or modify the internal ID of the customer location associated with the customer. |
|
oaCustomerLocation |
CustomerLocation |
active, created, deleted, id, name, notes, updated |
Read or modify customer locations. |
Previously, you could not specify the address fields to be returned when reading company, contact, customer, user, or vendor records using the XML API or SOAP API. The XML API returned values for all address fields under <addr>. The SOAP API either returned values for all address fields if the XML property names were used, or did not return any address field values if the SOAP property names were used (property names beginning with addr_, billing_addr_, or contact_addr_).
Now you can use the XML API or SOAP API to read specific address information.
When using the XML API, list the specific address information between <addr> and </addr> tags in the fields to be returned.
Note: Use <addr> for the address, <billingaddr> for the billing address (available for the Customer data type only), and <contactaddr> for the contact address (available for the Customer data type only).
Example:
                    <_Return>
    <addr>
        <city/>
    </addr>
    <contactaddr>
        <email/>
        <mobile/>
    </contactaddr>
    <name/>
    <id/>
</_Return>
When using the SOAP API, list the specific address information in the fields of the ReadRequest complex type. Specific address information property names follow the format addr_*. Example: addr_city.
Note: Use addr_* for the address, billingaddr_* or billing_addr_* for the billing address (available for the Customer data type only), and contactaddr_* or contact_addr_* for the contact address (available for the Customer data type only).
New extensions to the OpenAir REST API.
This release includes the following REST API enhancements:
The following resources are available:
ProjectMilestone
ProjectPhase
ProjectTask
The following methods are available:
POST /projects/from-template — Create a project from template.
POST /projects/{id}/attachments — Add attachments associated with a project.
GET /projects/{id}/attachments — Get the list of attachments associated with a project.
GET /projects/{id}/attachments/{attachment_id} — Add an attachment associated with a project.
GET /projects/{id}/attachments/{attachment_id}/download — Add an attachment file associated with a project.
DELETE /projects/{id}/attachments/{attachment_id} — Delete an attachment associated with a project.
DELETE /projects/{id}/attachments/{attachment_ids} — Delete attachments associated with a project.
GET /project-milestones/ — Get the list of project milestones.
GET /project-milestones/{id} — Get a project milestone.
OPTIONS /project-milestones/ — Discover available methods and fetch the endpoint reference for project milestones.
GET /project-phases/ — Get the list of project phases.
GET /project-phases/{id} — Get a project phase.
OPTIONS /project-phases/ — Discover available methods and fetch the endpoint reference for project phases.
POST /project-tasks/ — Insert a project task.
GET /project-tasks/ — Get the list of project tasks.
GET /project-tasks/{id} — Get a project task.
OPTIONS /project-tasks/ — Discover available methods and fetch the endpoint reference for project tasks.
POST /project-tasks/{id}/attachments — Add attachments associated with a project task.
GET /project-tasks/{id}/attachments — Get the list of attachments associated with a project task.
GET /project-tasks/{id}/attachments/{attachment_id} — Add an attachment associated with a project task.
GET /project-tasks/{id}/attachments/{attachment_id}/download — Add an attachment file associated with a project task.
DELETE /project-tasks/{id}/attachments/{attachment_id} — Delete an attachment associated with a project task.
DELETE /project-tasks/{id}/attachments/{attachment_ids} — Delete attachments associated with a project task.
The Filtering, Pagination and Expansion features are supported when working with Projects, Project Attachments, Project Tasks, Project Phases and Project Milestones using the REST API.
Use the query string parameter filterSetId to specify the internal ID of the filter set to be applied when inserting or updating objects using a POST or PUT method or deleting an object using the DELETE method. The filterSetId parameter was introduced in the April 9, 2022 OpenAir release for the READ method. All available OpenAir REST API resources and CRUD methods now support the filterSetId parameter.
When specified, the request is successful only if the action is available when the specified filter set is active in OpenAir. The filter set with the specified internal ID must exist and must be associated with the user who authorized the application as per the access token.
Otherwise and by default, the primary filter set associated with the user who authorized the application is applied.
OpenAir REST API returns an error with HTTP Status Code 403 Forbidden when:
The specified filter set does not exist or is not associated with the user on behalf of whom the client application is using the REST API to access OpenAir.
When the specified filter set is applied, the user on behalf of whom the client application is using the REST API to access OpenAir does not have access to the requested resource.
The Filtering and Pagination features are supported when working with Contacts and Job Codes using the REST API.
For more information, see OpenAir REST API Reference Guide.
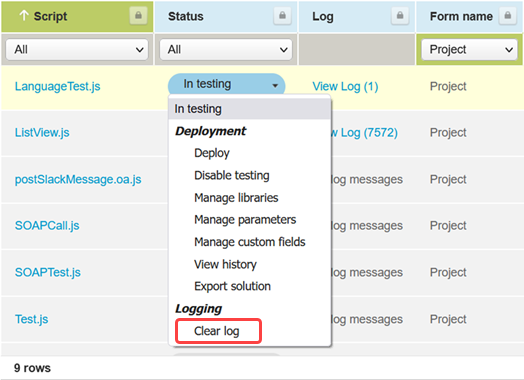
Clear all log entries for a specific script from the Scripting Center.
Go to Administration > Scripting Center.
Click the status dropdown for the script in the Status column, then click Clear log.
A confirmation dialog appears.
Click OK to clear the logs.
If there were any log messages to be cleared, the log now contains a single entry indicating that the log was cleared manually.
Increase the maximum body length of email messages that can be sent from your form or scheduled scripts.
Previously, the body length needed to be 30,000 characters or less. Email messages above this maximum body length were not sent.
The maximum body length can now be changed to suit your requirements. To increase the maximum body length you can send using the NSOA.meta.sendMail(message) function, contact OpenAir Customer Support.
upControl who can view the OData limits for your accounts by role permission.
Previously the OData limits page could only be viewed by users with the administrator role. You can now assign the View OData limits permission to any role to let users with this role view the OData limits page.
To view the OData limits, go to Administration > Global Settings > Account > OData limits.
Note: This functionality is available only if the OpenAir Business Intelligence Connector is enabled for your account. To enable the OpenAir Business Intelligence Connector, contact your OpenAir account manager.
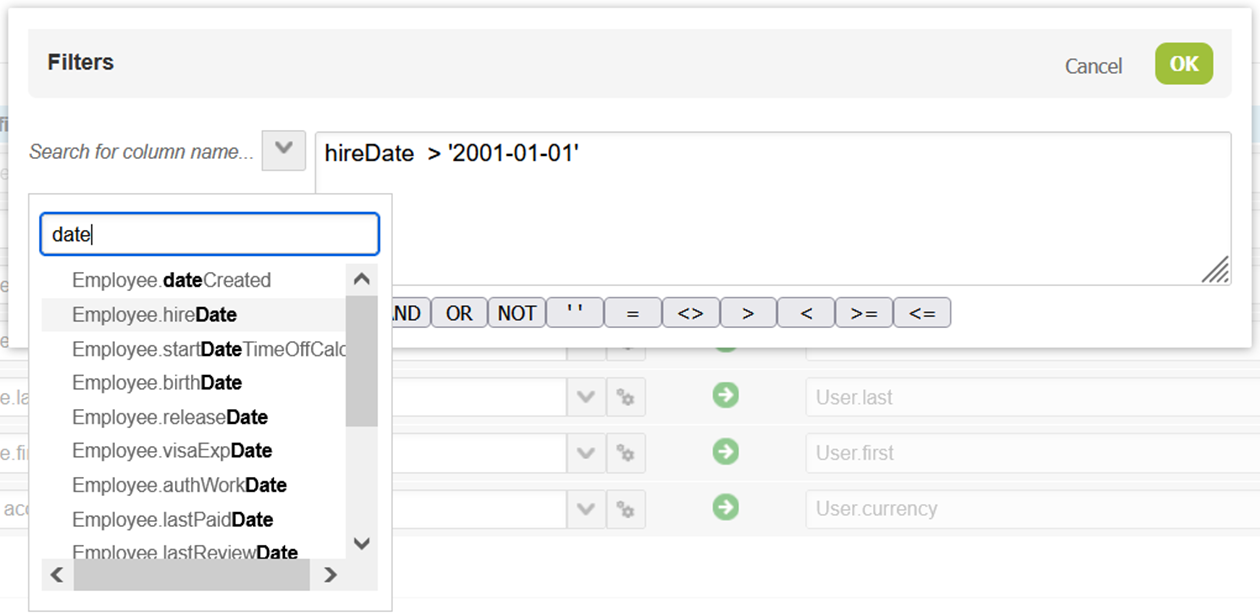
Use the new filter builder to define filter conditions for each import workflow.
Note: This functionality is only available if the New NetSuite Connector UI feature is enabled for your account. To enable the New NetSuite Connector UI feature, contact OpenAir Customer Support.
See also New NetSuite Connector User Interface.
The filter builder was introduced in the October 9, 2021 OpenAir release for custom export workflows and extended to support all export workflows in the April 9, 2022 OpenAir release. It is now available and replaces the previous filter user interface for all workflows importing information from NetSuite into OpenAir.
The filter builder lets you define filter conditions using a simple user interface to select fields and operators. It validates your filter syntax, and simplifies it by removing the need for field declaration and opening and closing filter block statements.
For more information about the filter builder, see Using Filters.
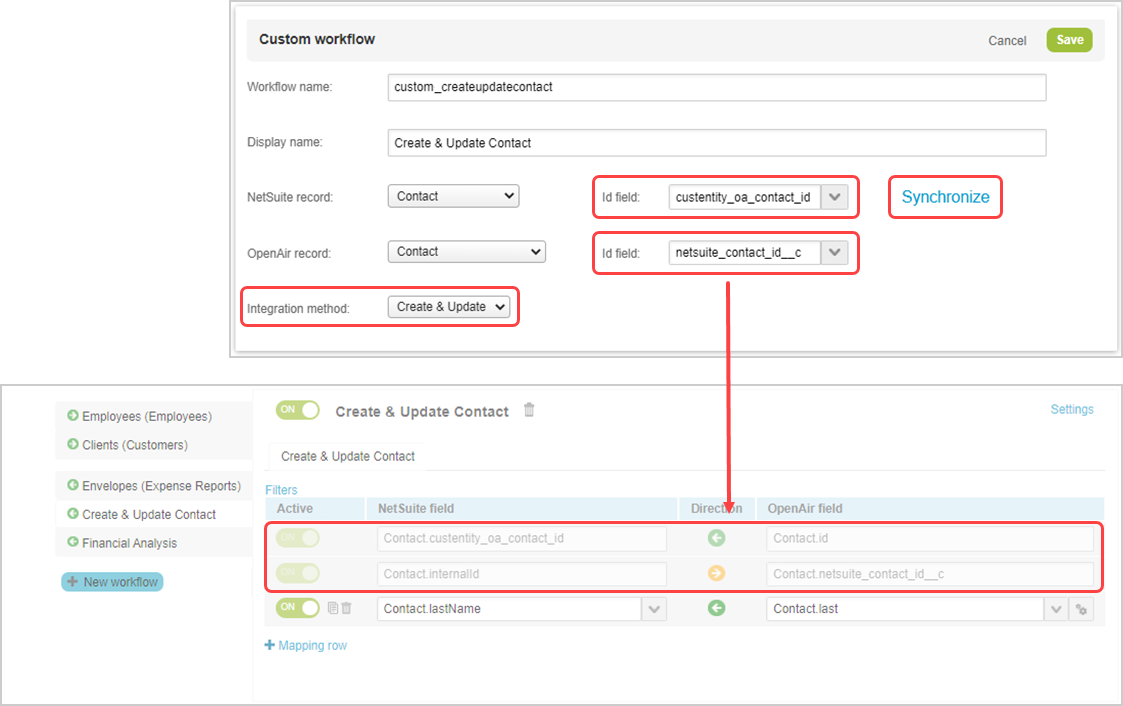
Create and update records in OpenAir and run the integration to export or update the corresponding records in NetSuite.
Previously, you could only use custom export workflows to create records in NetSuite, or to replace all records of a particular custom record type. Custom workflows exporting records from OpenAir to NetSuite can now be used both to create and to update records in NetSuite. To do so, set the Integration method to Create and Update on the configuration form when creating a new custom export workflow.
Important: Custom export workflows cannot be used to create and update records in NetSuite when exporting published OpenAir report data to NetSuite custom records.
The release introduces two additional features to the custom export workflow configuration. When you create a new custom export workflow, OpenAir NetSuite Connector lets you:
Select the ID fields that the integration will use to match each exported OpenAir record with a NetSuite record. The integration will store the internal ID of the OpenAir record in NetSuite and the internal ID of the NetSuite record in OpenAir using the ID fields you select when creating the custom export workflow. The selected ID fields cannot be changed after you save the custom export workflow configuration.
Note: ID fields are required when configuring a custom export workflow to Create Only or to Create and Update records in NetSuite.
Previously, you selected the ID fields when configuring the field mapping for the workflow. The mapping rows were required but you could edit the destination field. Now, you select the ID fields when creating the workflow, and the required mapping rows are protected and cannot be modified.
Click the Synchronize link to update the NetSuite custom fields available for field mapping without leaving the custom export workflow configuration form. This allows you to see the latest list of NetSuite custom field and select a suitable ID field from this list.
For more information about exporting records from OpenAir to NetSuite using custom export workflows, see Exporting Records from OpenAir to NetSuite Using Custom Workflows.
View online help for each NetSuite Connector workflow setting.
Click the workflow setting to view the corresponding help topic in the OpenAir Help Center. The OpenAir Help Center opens in a new browser tab or window.
Note: The OpenAir Help Center is a standard feature. Account administrators can view the Help Center and control who can view the Help Center by role permission.
View internal field mappings and mapping group tabs used by the integration.
Previously hidden internal field mappings and mapping group tabs are now shown for the following workflows:
Employees (Employees) Import
Employees (Vendors) Import
POs (Purchase Orders) Import
POs (Vendor Bills) Import
POs (Vendor Credits) Import
Vendors (Vendors) Import
Expense Reports (Expense Reports) Export
Note: Internal mappings used by the integration depend on your OpenAir NetSuite Connector configuration. Internal field mappings and mapping group tabs are visible only if used by the integration in its current configuration.
Use the Project mapping group to include project-specific information from the project record in OpenAir as header information on the NetSuite credit memo transaction record.
Similarly to the Project mapping group for the Invoices (Invoices) export workflow, the new tab lets you include header information sourced from the project record in OpenAir.
For more information about exporting credit (negative invoice) records from OpenAir to NetSuite as credit memos, see Send OpenAir Credits (Negative Invoices) as NetSuite Credit Memos Export Workflow.
Important: Review the following guidelines:
To include project-specific information in the exported header information, each invoice and credit record in OpenAir must relate to one project only. To restrict each invoice and credit to one project only in OpenAir, check the One project per invoice box in Administration > Application Settings > Invoices > Other settings.
If you add custom mapping definitions in the Project mapping group tab for the NetSuite fields that are also mapped in the Credit mapping group tab, the field mapping definition in the Project mapping group tab takes precedence, any value set for that NetSuite field using the Project field mapping definition overrides the value set for that NetSuite field using the Credit field mapping definition.
Speed up your Employees (Employees) and Projects (Projects) import workflows by ensuring only that records are only included in the integration run if one or more integrated field values have changed.
To enable the Monitored Fields feature for employee and project records, update NetSuite OpenAir SRP Integration bundle 369637 (previously 2851) to Version 3.0.
The feature is available by default for all NetSuite <> OpenAir integration deployments with the latest integration bundles installed in NetSuite. For more information about enabling the feature, see Enabling Monitored Fields for Import Workflows.
Note: Monitored fields for employee and project records will be introduced in Version 3.0 of the NetSuite OpenAir SRP Integration bundle 369637 (previously 2851).
The Monitored Fields feature is also available for project task records (NetSuite OpenAir SRP Integration bundle Version 2.04 or later) and customers (Version 2.08 or later).
The NetSuite OpenAir SRP Real-time Add-on bundle 369630 (previously 12610) Version 2.0 or later is also required to use monitored fields with the real-time integration.
Copy the bookings from an OpenAir project template when you import a new project from NetSuite into OpenAir.
The integration lets you select an OpenAir Project Template when creating a new project record in NetSuite. When you import the project into OpenAir, the OpenAir project contains project-related information copied from the template.
You can now also check the Duplicate bookings box on the project record in NetSuite to copy all bookings from the specified OpenAir project template on to the imported project in OpenAir.
To enable this feature, update NetSuite OpenAir SRP Integration bundle 369637 (previously 2851) to Version 3.0.
Note: The ability to create project templates complete with bookings and then copy all bookings from your templates across to the new projects you create from these templates in OpenAir was introduced in the April 2022 OpenAir release.
Enable the Autorecovery feature for the Customers (Customers) and Projects (Projects) export workflows.
The Autorecovery feature for the Expense Reports (Expense Reports) workflow has been extended to prevent the creation of duplicated vendor bills when exporting expense reports from OpenAir to NetSuite as vendor bills. Previously, the Autorecovery feature only covered expense reports exported to NetSuite as expense reports.
Note: You should enable the Autorecovery feature for all export workflows where available.
OpenAir marks a record as exported and shows the ID of the corresponding record in NetSuite on the entity property form if the record exported successfully to NetSuite. If the export process is interrupted before OpenAir receives a response from NetSuite, records may be exported to NetSuite but not marked as exported in OpenAir. In this case, the record will be exported again the next time the integration workflow runs creating duplicate records in NetSuite.
The autorecovery feature prevents the creation of duplicated records by identifying records included for export in the interrupted integration run, and verifying if the record was already exported to NetSuite. If the record exists in NetSuite, OpenAir NetSuite Connector updates the exported record in OpenAir. Otherwise, the record will be exported again.
In NetSuite, update the NetSuite OpenAir SRP Integration bundle 369637 (previously 2851) to Version 3.0 or later.
In OpenAir, go to Administration > NetSuite Connector.
Click the Tips button then NetSuite Connector administration. The NetSuite Connector administration form opens.
Check the following boxes under the Autorecovery section of the form:
Verify customer export
Verify expense report export
Verify project export
The Health Check now shows an error if OpenAir NetSuite Connector uses the 2016.2 NetSuite communication endpoint, which is no longer supported. See End of Support for the 2016.2 NetSuite Communication Endpoint and the Legacy NetSuite Connector UI.
The following actions are required:
Enable the New NetSuite Connector UI feature. To do so, contact OpenAir Customer Support. See also New NetSuite Connector User Interface.
Configure OpenAir NetSuite Connector to use the 2020.1 NetSuite communication endpoint. See NetSuite 2020.1 Communication Endpoint.
You should also enable the Direct Token-Based Authentication feature. See Direct Token-Based Authentication.
All four NetSuite bundles for the NetSuite <> OpenAir integration will soon include SuiteScript 2 versions of all scripts.
NetSuite OpenAir SRP Integration (Bundle ID 369637) Version 3.0 or later. Available since October 5, 2022. Includes both SuiteScript 2.1 and SuiteScript 1.0 versions of scripts.
NetSuite OpenAir SRP Single Sign-On (Bundle ID 369619) Version 6.0 or later. Available since October 5, 2022. Includes both SuiteScript 2.0 (OpenAir: Home module portlet script) or SuiteScript 2.1 (all other scripts) and SuiteScript 1.0 versions of scripts.
NetSuite OpenAir SRP Real-time Add-On (Bundle ID 369630) Version 2.03 or later. Available since October 5, 2022. Includes both SuiteScript 2.0 and SuiteScript 1.0 versions of scripts
NetSuite OpenAir SRP ARM (Bundle ID 370366) Version 0.96 or later. Available since July 13, 2022. Includes both SuiteScript 2.0 and SuiteScript 1.0 versions of scripts.
Important: You should update NetSuite integration bundles to the latest version available to take advantage of new features.
Update the NetSuite OpenAir SRP Integration bundle (Bundle ID 369637) to version 3.0 or later before you update NetSuite OpenAir SRP Single Sign-On (Bundle ID 369619) to version 6.0 or later, or NetSuite OpenAir SRP Real-time Add-On (Bundle ID 369630) to version 2.03 or later. NetSuite OpenAir SRP Integration bundle (Bundle ID 369637) 3.0 creates a custom record type and a custom record that are required when updating the other bundles.
After you update the bundles, you can switch to the SuiteScript 2 versions of scripts in each bundle, or continue to use the updated SuiteScript 1.0 versions. All SuiteScript 1.0 versions that were deployed before the update are deployed by default after the update. When updating the NetSuite OpenAir SRP Real-time Add-On from version 2.0, 2.01, or 2.02, SuiteScript 1.0 or SuiteScript 2.0 versions that were deployed before the update are deployed by default after the update.
In NetSuite, go to Customization > Scripting > Scripts.
For each deployed SuiteScript 1.0 versions of the OpenAir SRP integration bundle scripts:
Locate the script in the list and click Edit.
On the Deployments subtab, make a note of the script and all deployment list entries with a YES under Deployed. If the script applies to different record types or events, and is deployed only for specific record types or events, you will need to refer to this list to deploy the SuiteScript 2 equivalent later.
For each list entry, clear the Deployed box then click OK.
Click Save.
For each SuiteScript 2 versions of the OpenAir SRP integration bundle scripts :
Locate the script in the list and click Edit.
On the Deployments subtab, for each deployment list entry equivalent to the SuiteScript 1.0 versions you undeployed earlier, check the Deployed box then click OK.
Verify that all SuiteScript 2 equivalent to the SuiteScript 1.0 versions you undeployed earlier are deployed to ensure that you retain the same integration functionality.
Click Save.
Important: Review the Switch to SuiteScript 2 Versions Additional Guidelines
After you switch to SuiteScript 2 versions of the NetSuite OpenAir SRP Single Sign-On (Bundle ID 369619) or NetSuite OpenAir SRP Real-time Add-On (Bundle ID 369630) scripts, edit existing Portlet, Suitelet and User Event connection points in the SuiteSignOn record for OpenAir. To do so:
Go to Setup > Integration > SuiteSignOn.
Click the name of the SuiteSignOn record for OpenAir.
Click Edit.
On the Connection Points subtab, for each Portlet, Suitelet and User Event connection points, do the following:
Click the SuiteScript 1.0 script name under Display Context.
Select the SuiteScript 2 equivalent from the dropdown list.
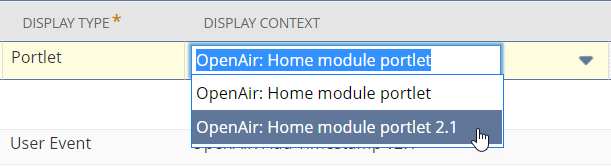
Click OK.
Click Save.
In most cases, upgraded versions of the script have the same name as their SuiteScript 1.0 equivalent followed by the version number (v2.1 or 2.1 for example).
Note the following exceptions:
There are no SuiteScript 1.0 equivalent for OpenAir: Add Timestamp v2.1. Only the SuiteScript 2.0 version was present in previous versions of the bundle. The script has been upgraded to SuiteScript 2.1 and are deployed by default. There are no actions required for this script.
OpenAir: 'Export to OpenAir' Flags v2.1 is equivalent to the SuiteScript 1.0 OpenAir: Set 'Export to OpenAir' Flags
OpenAir: Set 'Limit Time...' v2.1 is equivalent to the SuiteScript 1.0 OpenAir: Set 'Limit Time and Expenses'
OpenAir: 'Limit Time...' Client v2.1 is equivalent to the SuiteScript 1.0 OpenAir: Set 'Limit Time and Exp' Client
OpenAir: Rev. Rec. % Complete v2.1 is equivalent to the SuiteScript 1.0 OpenAir: Rev Rec PCO
The SuiteScript 1.0 OpenAir: SFA Integration has no SuiteScript 2 equivalent. Support for this feature ended with the April 2021 OpenAir release.
Most of your integration settings and preferences are copied to the OpenAir: SRP Integration Settings custom record so they can be maintained after you update the bundles and switch to SuiteScript 2 versions.
Note the following exceptions:
NetSuite OpenAir SRP Integration
After you deploy the OpenAir: PO/VB/VC Validate v2.1 script, you need to change preferences at the user level to let employees view projects and items and check the Billable and Export to OpenAir boxes for purchase order (or vendor bill and vendor credit) line items and purchase order (or vendor bill and vendor credit) records. To do so, go to Home > Set Preferences and check the Validate OpenAir PO/Vendor Bill 2 box on the Custom Preferences tab.
After you deploy the OpenAir: Create JE from Time v2.1 script, you need to change the parameters for this script deployment manually to match the settings for the previous SuiteScript 1.0 deployment. To do so, go to Customization > Scripting > Script Deployments, locate the deployment for the OpenAir: Create JE from Time v2.1 script and click Edit, go to the Parameters subtab and edit the parameters.
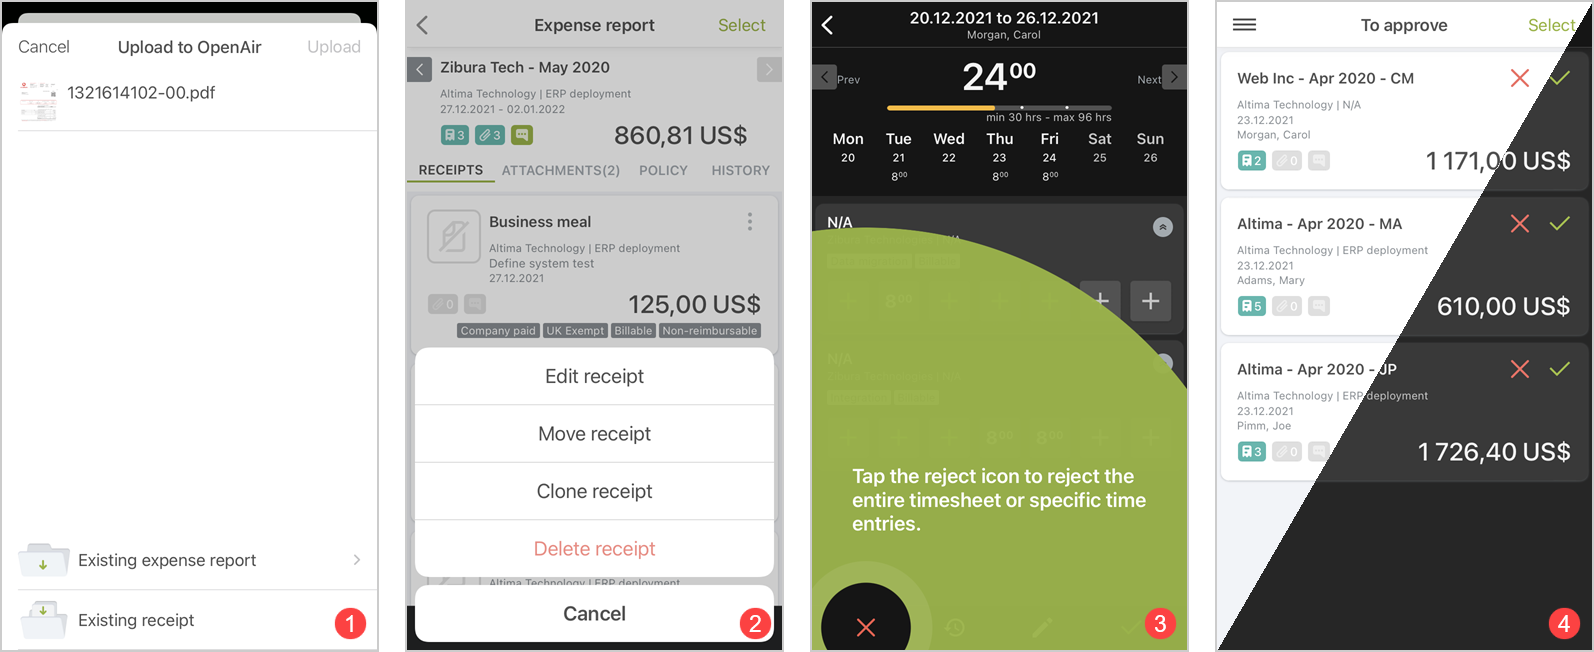
Download OpenAir Mobile 4.3 from the App Store (iOS devices) or Google Play Store (Android devices) and get a sneak peek at the upcoming features in version 4.4.
OpenAir Mobile 4.3 is available now for iOS and Android devices and lets you work quicker and more easily than ever with expenses using the following features:
Add attachments to your expense reports and receipts directly from other apps using the share function on your device. Browse and select files stored on your device or in the cloud using your preferred app and send them to OpenAir Mobile without leaving the app. The new share functionality lets you choose the expense report or receipt you want to add the attachments to.
Clone an existing expense report, along with all receipts therein. Move a receipt across to another expense report, duplicate a receipt in the same expense report, or copy a receipt across to a different expense report. Tap the clone icon, or tap the more actions icon then choose the move or clone action from the context menu. OpenAir Mobile lets you change any of the receipt details as well as select the destination expense report before you move a receipt or create a duplicate receipt.
View in-app tips highlighting feature changes after you update the OpenAir Mobile app. For example, OpenAir Mobile 4.3 simplifies the way you reject selected time entries or the whole timesheets with both options available when you tap the reject icon. The app point out this feature change the first time you go to a timesheet to approve after updating to version 4.3.
Choose between a light display theme, a dark display theme, or the display theme selected in your device settings. Activate the dark theme to reduce eye strain and avoid disturbing others when working with timesheets and expenses in low-light settings.
Edit expense reports and timesheets to approve, or edit or delete expense reports and timesheets already submitted for approval (if your OpenAir account configuration permits it).
For more information, see the updated OpenAir Mobile User Guide.
OpenAir Mobile 4.4 will be available for iOS and Android devices later in 2022 and will include the following features:
Get the latest information as soon as you open the app with fully automatic data synchronization.
Create a new timesheet and expense report by clicking the New timesheet and New expense report home screen shortcuts.
View the task ID and the parent phase when you select a task on your timesheets or receipts. The additional information helps you differentiate between tasks with the same or similar names.

up
Usage of the generic domain www.openair.com for integrations and add-on services is deprecated and will be removed in the April 2023 OpenAir release.
As announced in the October 2019 and April 2020 OpenAir Release Notes, all connections to your OpenAir account should now use your account-specific domain.
As announced in the October 2021 OpenAir Release Notes and effective with the April 2023 OpenAir release, usage of account-specific domains for integrations and add-on services will be enforced for all accounts. After April 2023, integrations and add-on services will no longer be able to access OpenAir using the generic domain www.openair.com.
Important: Ensure you update all connections to use your account-specific domain before the April 2023 OpenAir release.
The URL for OpenAir services includes the domain for your OpenAir account <account-domain>. It may also include the specific path for the OpenAir service you are accessing <service-path>.
https://<account-domain>/<service-path>
Account-specific domains contain a unique account identifier <company-id> as part of the domain name. The account identifier is typically based on your OpenAir Company ID.
Account-specific domains depend on the account type:
Production account-specific domain: <company-id>.app.openair.com
Sandbox account-specific domain: <company-id>.app.sandbox.openair.com
Demo account-specific domain: <company-id>.app.demo.openair.com
The following table lists URLs used for account integrations and add-on services:
|
Integration / Service |
URL |
|---|---|
|
OpenAir OData feed — reports OpenAir OData feed — list views |
https://<account-domain>/odata/v4/reports/ https://<account-domain>/odata/v4/listviews/ |
|
OpenAir SOAP API requests |
https://<account-domain>/soap |
|
OpenAir XML API requests |
https://<account-domain>/api.pl |
|
NetSuite Single Sign-on (SuiteSignOn) NetSuite<>OpenAir real-time integration SuiteSignOn record |
https://<account-domain>/netsuite.pl |
|
OpenAir Exchange Manager OpenAir Integration Manager OpenAir Integration Manager shortcuts OpenAir OffLine OpenAir Outlook Connector OpenAir Project Connector |
https://<account-domain> |
Note: OpenAir Mobile users do not need to update their connection settings on the app if OpenAir Mobile 2.3.2 (Android), 2.6.7 (iPhone) or a later version is installed on their device.
Tip: Use the web services log detail report to identify integration points that still use generic endpoints. You can inspect an API request for each integration point and determine whether the endpoint in use is generic or account specific. Any integration point that uses the generic endpoint must be updated.
Integration points are typically differentiated by client type but this may not be the case, depending on your integration configuration.
To enable the Web Services Log Detail Report optional feature, contact OpenAir Customer Support.
OpenAir will end support for the QuickBooks integration using the OpenAir Integration Manager add-on service with the April 2023 OpenAir release.
Important: Discuss this upcoming change with your IT team and aim to replace any usage of the OpenAir QuickBooks integration before April 2023.
OpenAir will end support for the 2016.2 NetSuite communication endpoint and the legacy OpenAir NetSuite Connector UI with the October 2022 release.
NetSuite has ended support for its 2016.2 communication endpoint and the New NetSuite Connector UI is required to use OpenAir NetSuite Connector with the 2020.1 endpoint.
Important: The following actions are required:
Enable the New NetSuite Connector UI feature. To do so, contact OpenAir Customer Support. See also New NetSuite Connector User Interface.
Configure OpenAir NetSuite Connector to use the 2020.1 NetSuite communication endpoint. See NetSuite 2020.1 Communication Endpoint.
You should also enable the Direct Token-Based Authentication feature. See Direct Token-Based Authentication.